Restomod AllStarLink audio interface project, how to know what you just upgraded on your AllStarLink node, used Ten-Tec Scout 555 received, and a bunch of musings
Podcast version available!
The audio version of issue 104 was published a few days ago and is available on several podcast streaming services as well as right here on The Random Wire at https://www.randomwire.us/podcast.
Support
The Random Wire℠ remains free and I’d like to keep it that way. I do incur some costs in the making of the newsletter and the podcast. If you wish to help me defray some of those costs, there are several ways to do so, described on the Support page. Thank you in advance for your help!
.-. .- -. -.. — — / .– .. .-. . / .-. . …- .. . .– / -… -.– / -.- .— –… –
Topics in Issue 104
1. ASL: Restomod of PC-1A Phone Patch Controller
1.1 Master Communications RL-20 board
1.2 Microphone connections
2. ASL: How To Know What You Just Upgraded
2.1 Find what is upgradable
2.2 Find what you just upgraded
2.3 Confirm your Debian release
2.4 Find your Asterisk/ASL version
3. RF: Scout 555 Received
4. Musings
4.1 QRZ renewed
4.2 Should have been writing
4.3 Skywarn operations on network radios
4.4 Heltec mesh node T114 first look
4.5 Snakebit with RAK-based Meshtastic devices
4.6 Module 17 developments
4.7 Lightsaber news
4.8 Radxa ROCK 320C palm-sized computer
4.9 ARRL News on your AllStarLink node
4.10 Dynamic mic with pre-amp
5. Closing
.-. .- -. -.. — — / .– .. .-. . / .-. . …- .. . .– / -… -.– / -.- .— –… –
1. ASL: Restomod of PC-1A Phone Patch Controller
It’s time to start thinking about how to wire the bits and pieces together in my conversion of a Kenwood PC-1A phone patch controller to serve as an AllStarLink radio-less node audio interface. What follows is my thinking so far. I do not claim that my understanding is accurate or complete! The process I’m following is educating me on circuit design and wiring basics. Your questions and suggestions will not only be welcome, they will help me learn!
Resources I’m leaning on include:
1.1 Master Communications RL-20 board
There are four places on the Master Communications RL-20 board for connections. Power will come in via the USB port from the device running AllStarLink 3.3
For the audio amplifier that will power the speaker/earphone jack (audio out), there are a couple of special solder points on the board labeled AUDIO AMP. For sending 5VDC to a DTMF microphone, there are two other special solder points on the board.
RL-20 Pin 2
At one end of the RL-20 board is a DB9 solder pad. Pin 2 is audio out (left channel) so that will feed a 5KΩ potentiometer before the signal goes through a PAM3806 audio amplifier.
RL-20 Pin 3
Pin 3 is connected to the 8-pin mic connector pin 2 and carries the push-to-talk (PTT) COS. (COS means “carrier operated switch” and is synonymous with COR “carrier operated relay.” Says the AllStarLink wiki: “The purpose of the COR signal is to change state when there is a signal being received by the receiver.”)
RL-20 Pin 6
Pin 6 is for audio input. But I’ll want to be able to change the audio input before it reaches the RL-20 board, and for that I’ll run the audio through a 5KΩ potentiometer and MAX9814 audio amplifier before sending the signal on to RL-20 Pin 6. The MAX9814 with onboard automatic gain control will also serve as an audio conditioner.
1.2 Microphone connections
The 8-pin round connector on the Kenwood PC-1A panel works with my Kenwood MC-60A and Alinco EMS-57 microphones. On the 8-pin round connector, pins 1 through 8 are used like this:
Pin 1: microphone to a 5KΩ potentiometer (left pad on the pot) for controlling mic gain.
Pin 2: this is the PTT COS that connects to RL-20 Pin 3. Kevin at Master Communications knew I was going to use the RL-20 for a radio-less node so he reversed LED1 and LED3 so that PTT will activate the red LED in the LED3 position.
Pin 3:
Pin 4:
Pin 5: this sends audio to the MAX9814 U+ pin position.
Pin 6:
Pin 7:
Pin 8: ground.
That’s as far as I got this week.
.-. .- -. -.. — — / .– .. .-. . / .-. . …- .. . .– / -… -.– / -.- .— –… –
2. ASL: How To Know What You Just Upgraded
My AllStarLink (ASL) node 588411 runs in a VirtualBox virtual machine on my home network. Node 588411 is based on ASL 3 in a Debian 12 machine.
(While I work on this, I’m listening to the Puget Sound Repeater Group 9 AM net [node 2462] on my 588417 SHARI machine and a Retevis handie-talkie. Whenever another node connects, 588417 announces it privately to me. I see I need to change the telemetry configuration on 588417 to fix that!)
Updating and upgrading follow the usual two-step “apt dance” as in:
sudo apt update
sudo apt upgrade -y
2.1 Find what is upgradable
To find what is upgradable (and I always synchronize my repositories first by issuing the sudo apt update command) you would issue this command in the terminal:
sudo apt list --upgradable 2.2 Find what you just upgraded
But what if you want to see what packages were upgraded after you run sudo apt upgrade? If you haven’t logged out of your session, just tail the log file:
cd /var/log/apt
tail term.log
Want to make a record of it?
tail term.log > upgraded.txtWant to send that to another machine via Tailscale? For example, sending upgraded.txt from 588411 to my local machine named tombee looks like this:
tailscale file cp upgraded.txt tombee:(Note that wildcards are supported. I transferred several screenshots in PNG format by issuing “tailscale file cp *.png tombee:” and it worked fine.)
Now what if you want to find what was upgraded and you’ve already logged out of the machine? No problem. Log back in and issue this in the terminal:
zcat -qf /var/log/apt/history.log* | grep " install "The output of the two commands looks a bit different but you’ll be able to glean the pertinent information without trouble. For example, the upgraded.txt file reports this for the upgrade I ran Sunday on my virtual machine node 588411:
Setting up libavdevice59:amd64 (7:5.1.6-0+deb12u1) ...
Setting up asl3-asterisk (2:20.9.1+asl3-3.0.4-1.deb12) ...
Setting up ffmpeg (7:5.1.6-0+deb12u1) ...
Processing triggers for desktop-file-utils (0.26-1) ...
Processing triggers for hicolor-icon-theme (0.17-2) ...
Processing triggers for libc-bin (2.36-9+deb12u7) ...
Processing triggers for man-db (2.11.2-2) ...
Processing triggers for dbus (1.14.10-1~deb12u1) ...
Processing triggers for mailcap (3.70+nmu1) ...
Log ended: 2024-08-18  09:27:52
The history.log file is a bit longer because it captures the actual commands that are sent to the machine. Just scroll to the end of the file to find content that is similar to what we see in the upgraded.txt file.
Commandline: apt-get -o APT::Status-Fd=4 -o APT::Keep-Fds::=5 -o APT::Keep-Fds::=6 -q -y --no-remove install locales
Commandline: apt-get -o APT::Status-Fd=4 -o APT::Keep-Fds::=5 -o APT::Keep-Fds::=6 -q -y --no-remove install busybox
Commandline: apt-get -o APT::Status-Fd=4 -o APT::Keep-Fds::=5 -o APT::Keep-Fds::=6 -q -y --no-remove install zstd
Commandline: apt-get -o APT::Status-Fd=4 -o APT::Keep-Fds::=5 -o APT::Keep-Fds::=6 -q -y --no-remove install initramfs-tools
Commandline: apt-get -o APT::Status-Fd=4 -o APT::Keep-Fds::=5 -o APT::Keep-Fds::=6 -q -y --no-remove -o APT::Install-Recommends=true install linux-image-amd64
Commandline: apt-get -o APT::Status-Fd=4 -o APT::Keep-Fds::=5 -o APT::Keep-Fds::=6 -q -y --no-remove install pciutils
Commandline: apt-get -o APT::Status-Fd=4 -o APT::Keep-Fds::=5 -o APT::Keep-Fds::=6 -q -y --no-remove install usbutils
Commandline: apt-get -o APT::Status-Fd=4 -o APT::Keep-Fds::=5 -o APT::Keep-Fds::=6 -q -y --no-remove install eject
Commandline: apt-get -o APT::Status-Fd=4 -o APT::Keep-Fds::=5 -o APT::Keep-Fds::=6 -q -y --no-remove install keyboard-configuration
Commandline: apt-get -o APT::Status-Fd=4 -o APT::Keep-Fds::=5 -o APT::Keep-Fds::=6 -q -y --no-remove install console-setup
Commandline: apt-get -o APT::Status-Fd=4 -o APT::Keep-Fds::=5 -o APT::Keep-Fds::=6 -q -y --no-remove install laptop-detect
Commandline: apt-get -o APT::Status-Fd=4 -o APT::Keep-Fds::=5 -o APT::Keep-Fds::=6 -q -y --no-remove install discover
Commandline: apt-get -o APT::Status-Fd=4 -o APT::Keep-Fds::=5 -o APT::Keep-Fds::=6 -q -y --no-remove -o APT::Install-Recommends=false install installation-report
Commandline: apt-get -o APT::Status-Fd=4 -o APT::Keep-Fds::=5 -o APT::Keep-Fds::=6 -q -y --no-remove -o APT::Install-Recommends=false install popularity-contest
Commandline: apt-get -o APT::Status-Fd=4 -o APT::Keep-Fds::=5 -o APT::Keep-Fds::=6 -q -y -o APT::Install-Recommends=true -o APT::Get::AutomaticRemove=true -o Acquire::Retries=3 install task-english reportbug man-db traceroute bzip2 ucf openssh-client manpages bind9-dnsutils krb5-locales python3-reportbug inetutils-telnet media-types bind9-host wget lsof perl xz-utils apt-listchanges wamerican gettext-base groff-base libpam-systemd doc-debian netcat-traditional mime-support libnss-systemd ca-certificates file systemd-timesyncd bash-completion debian-faq liblockfile-bin dbus ncurses-term task-web-server task-desktop task-xfce-desktop task-ssh-server
Commandline: apt-get -o APT::Status-Fd=4 -o APT::Keep-Fds::=5 -o APT::Keep-Fds::=6 -q -y --no-remove install grub-common
Commandline: apt-get -o APT::Status-Fd=4 -o APT::Keep-Fds::=5 -o APT::Keep-Fds::=6 -q -y --no-remove install grub-pc
Commandline: apt-get -o APT::Status-Fd=4 -o APT::Keep-Fds::=5 -o APT::Keep-Fds::=6 -q -y --no-remove -o APT::Install-Recommends=true install intel-microcode
Commandline: apt install asl3
Commandline: apt-get install allmon3
Commandline: apt install asl3-update-nodelist
Commandline: apt install ufw
Commandline: apt install xrdp
Commandline: apt install mlocate
Commandline: apt install -y apt-transport-https lsb-release ca-certificates wget
Commandline: apt install -y php8.3
Commandline: apt-get install -y php-sqlite3 php-curl
Commandline: apt-get install tailscale
Commandline: apt install unzip python3 python3-pip ffmpeg
Commandline: apt install python3-ruamel.yaml python3-requests python3-dateutil python3-pydub
Commandline: apt-get install postfix
2.3 Confirm your Debian release
By the way, you might want to confirm what release of Debian you are running. Here are four different commands that will give you important information about your system:
cat /etc/os-release
lsb_release -a
hostnamectl
uname -r
2.4 Find your Asterisk/ASL version
What version of Asterisk/ASL are you running? The easiest way is through the AllStarLink Main Menu. In the terminal, enter:
asl-menuIn AllStarLink 3.0.4, the third and fourth menu choices are good places to start. Simplest is menu option 4 Show System Version Numbers:

You can also select 3 Enter the Asterisk CLI. Once in the CLI, enter:
core show versionThe result looks like this:

You can also select option 5 Diagnostics Menu and then option 3 Show Asterisk Version (“ASL Main Menu —> Diagnostics Menu —> Show Asterisk version”). This method gives you the same information as using the Asterisk CLI:

.-. .- -. -.. — — / .– .. .-. . / .-. . …- .. . .– / -… -.– / -.- .— –… –
3. RF: Scout 555 Received
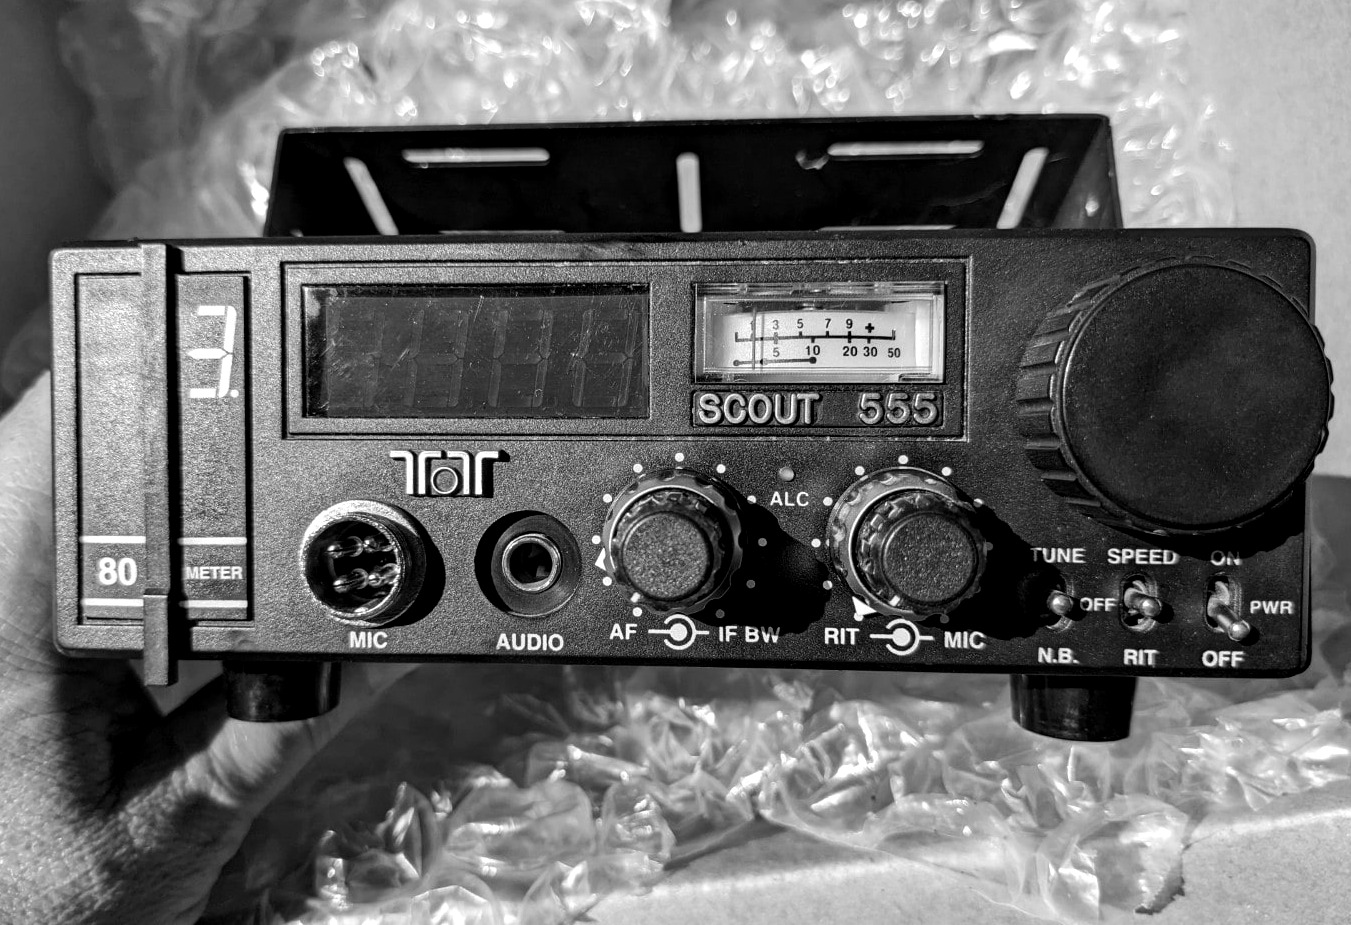
As I mentioned last week, buying used radio equipment on eBay is a gamble. I received a Ten-Tec Scout 555 HF radio this week and it is in slightly worse condition than I expected…but overall, it isn’t as bad as it could be. Last week, I said the front and rear panels appeared to be “relatively pristine.” For a radio that was manufactured circa 1993 (about 30 years ago) I expected some wear. This radio has some wear!
The radio was packed well and securely boxed. As is common with some microphones of this vintage, the cord sheath is cracked in a few places. A replacement sourced on eBay will arrive in a few days: Dynamic Mic wired for Ten Tec Scout 555/556, Argonaut, Jupiter, Omni VI, Corsair.
The front panel looks about as I expected and the back panel is clean enough. The top of the case is a bit filthy but that is easily cleaned. The dirt, though, caused me to crack open the case to see if the interior components were similarly dirty. (The photos above were taken outside in direct sunlight.)

The photo above shows the front panel in indoor light.
The photos above were taken indoors. You can see the wear on the bottom of the case. On the front panel, you can see dirt in crevices and the once-white plastic indicators have yellowed. Dirt is in the threads of the SO-239 adapter, too. This level of grime is not unexpected.
The interior photos show less dirt than I expected. I’ll use compressed air to clear out the small amount of dust that has accumulated inside the case. I also bought a new can of DeoxIT D5 (affiliate link: https://amzn.to/3AB7AME) to “freshen up” a few of the connections.
No time this week to raise the antenna and power up this Scout 555. Soon though!
.-. .- -. -.. — — / .– .. .-. . / .-. . …- .. . .– / -… -.– / -.- .— –… –
4. Musings
4.1 QRZ renewed
I renewed my QRZ Premium subscription this week. I’m hoping to get more time on HF in the next 12 months! Hope is not a plan, though, so let me restate this: I plan to get on HF more over the next 12 months.
All paid QRZ subscribers receive “unlimited daily callsign lookups, PLUS enables our Web Contact Log which lets visitors to your page leave simple messages that let you know they were there, and to give their wishes, congratulations, etc.”
I also appreciate having direct access to QRZ’s XML Data Port which is available to “popular logging programs like Ham Radio Deluxe, Amateur Contact Log, Win-EQF, LOGic7, and ProLog2K, just to name a few.”
4.2 Should have been writing
I ran across a trove of great old music CDs at a local Goodwill and brought home a bag of them. Rather than writing on Sunday, I spent part of the day ripping the CDs to my digital music folder.
To do this, I’m using a program called fre:ac which stands for free audio converter. This open source program uses the LAME encoder to convert the music files on the CD to MP3 files on my computer. The interface is a bit dated but after using it once, it feels like an old friend. The best part: it just works.
4.3 Skywarn operations on network radios
Last year, Lloyd KC5FM explained how Skywarn benefits from communications over “network radios.” Find his post about this on Blogspot.
What Lloyd wrote supports my belief that digital modes have a valuable place in the spectrum of resources that can be applied in emergency situations.
Traditionally, we’ve leaned on RF-based communications first, with other modes occupying second place if they were considered at all. I wonder: is this an artifact of the pre-digital era when RF is what we had? Considering the clarity and speed of digital comms, perhaps digital modes should be the first solution we turn to, with RF serving as the last resort when all else fails.
4.4 Heltec mesh node T114 first look
From the YouTube summary:
So Heltec have updated their popular LoRa 32 ESP32 node to this nice little device called the T114 Mesh Node with a host of improvements including colour TFT screen, low power consumption and plug and play GPS. Join me in this video where we unbox, test and try Meshtastic firmware on this cool new device.
Update: I purchased one (see topic 4.5 below!).

Total with shipping ($4.25 via YANWEN) and handling ($2.80) is $48.75. (NOTE: If you order through the Heltec site, it wants you to set up an account. When you do, your email address will not work as your user name! The error message I received was unhelpful so it took several tries before I figured this out.)
This device is also available through muzi WORKS.
4.5 Snakebit with RAK-based Meshtastic devices
Three RAK-based Meshtastic nodes from two vendors. Three system failures. In other words, every RAK-based device I own has failed within 24 hours of startup.
I have no idea why. I thought maybe my powerful USB charger was cooking the devices, so with the third, I very intentionally used a low power USB charger. That didn’t solve the problem. Nevertheless — and without any real proof — I lean toward poor voltage regulation as the culprit. The most recent vendor has sent a return label for the failed device so they can figure this out.
I am not alone in experiencing failed RAK devices:
https://meshtastic.discourse.group/t/help-rak4630-roof-node-failed-repeatly/14145/6
https://www.reddit.com/r/meshtastic/comments/1bonaw7/rak_wisblock_stopped_working/
I think for now, I’d better steer away from RAK-based devices. Perhaps the new Heltec T114 will provide the lower power consumption I’m looking for while also being more reliable than RAK-based nodes.
4.6 Module 17 developments
I like open source stuff. As noted in previous issues of The Random Wire, I’m kinda sorta following along on Module 17 (M17) developments.
The M17 Project “is developing open source hardware, software, and offers a complete digital radio protocol for data and voice, made by and for amateur radio operators.”
I find that a handheld radio for M17 is now available. Connect Systems is selling the CS7000-M17 HT for $299. They are also working on a plus version of this radio that will accommodate additional digital protocols.
If you’re interested in getting started with M17 on the hardware side, check out the STM32 M17 Modem Board from LILYGO. The cost with a screen is $39.13 US. It is designed to work with radios that support a 9600 baud data transfer rate. I’m just guessing but I’ll bet this would also work with a PC (or Raspberry Pi) running a modern soundcard emulator like Direwolf and maybe UZ7HO.
Of course, as I started to dig around on this topic, I found that Steve Stroh (Zero Retries) has been there already!
I like the looks of that M17 modem from LILYGO, so much so that I ordered one ($47.13 with standard shipping). This will be interesting to fiddle with.

4.7 Lightsaber news
For those interested in lightsaber crafting, this article will prove interesting: How Fresh-Out-of-College DIYers Built the Star Wars Lightsaber of Your Dreams
These makers have created a lightsaber that actually extends and retracts. If you are into this sort of thing, this is pretty fascinating news.
4.8 Radxa ROCK E20C palm-sized computer
I love a tiny computer. Extra points if it is cute. A few days back, Liliputing published an article on the Radxa ROCK tiny PC: Radxa ROCK E20C is a tiny 2.6 inch PC with a RK3528A chip and two Gigabit Ethernet ports for $25 and up
The ROCK is definitely a tiny, cute computer! The processor is a quad-core ARM Cortex A53 and the ROCK has a separate GPU. Memory is LPDDR4 and an eMMC is used for storage. It has a microSD slot, two USB-C ports (one is for power), and a USB-A port. Radxa claims it supports the Debian operating system.
From the Liliputing article:
You can buy the Radxa E20C from ARACE or AliExpress. Prices are a little lower at ARACE, but models with 4GB of RAM and 32GB of storage are only available from AliExpress.
I ordered the 2 Gb RAM, 16 Gb eMMC configuration for $35 plus $12 shipping. Once it arrives, I’m going to try to load Debian and AllStarLink onto this little thing. Fingers crossed for luck.
4.9 ARRL News on your AllStarLink node
Many of us with AllStarLink nodes know that we can hear the ARRL News over our ASL node, but I’m sure some newer ASL users aren’t aware of this.
From https://arrlnews.rfnet.link:
Allstar nodes may connect to Allstar node 516229 in monitor mode to hear ARRL Audio news. The first node to connect starts the audio news playback. Additional nodes connecting after the first node starts playback may hear only the later part of the audio news. Any node that transmits to 516229 will automatically be disconnected, since muting incoming connections is not provided by Allstar. Connecting in monitor mode will avoid disconnects during playback.
I tested this on Wednesday and it works fine. You can listen to the ARRL News at your convenience by connecting to node 516229 in monitor mode. I’ve saved 516229 as a favorite in my list of nodes.
4.10 Dynamic microphone with pre-amp
I was disappointed when I tried the Audio-Technica AT2005USB microphone* (the asterisk means this is an affiliate link) back in June. It is a dynamic mic that features USB and XLR connections. I just couldn’t get enough sound out of it.
Recently, I’ve been using a Behringer MIC500USB Audiophile Vacuum Tube Preamplifier* with a Behringer condenser microphone. That combination sounds a bit warmer and more natural to me. What if, I wondered, I tried the AT2005USB mic with the Behringer pre-amp? I did that yesterday and was very pleased with the sound.
I still had to boost the input gain on the pre-amp quite a bit but the sound samples I recorded sounded every bit as good as with the Behringer mic, and perhaps a bit cleaner. (By cleaner I mean a bit less background hiss.) I tested by speaking close to the mic with the foam windscreen. Since it’s a dynamic mic with a cardiod pattern, it should have better rejection of some background sounds. I asked my spouse to talk while I was recording some clips and for the most part, the mic rejected everything but my voice.
I think I’ll try this arrangement for the next Random Wire Reflections podcast!
.-. .- -. -.. — — / .– .. .-. . / .-. . …- .. . .– / -… -.– / -.- .— –… –
5. Closing
You can contact me in various ways. When I am at my Portland desk, AllStarLink node 588412 is always on. I often have 588411 (the one running on a virtual machine and connected to my Cisco desk phone) going. You can also call my Hamshack Hotline number (6101280) and if I don’t pick up, you can leave a message there.
By the way, thank you to Andrew WA4MTP for leaving me a voice message on Hamshack Hotline! HH sends me an audio file of the message, making it very easy to stay caught up.
I do work full time managing a statewide nonprofit association so I may not be able to respond immediately, but I will get back to you.
Special thanks to a radio friend for inviting me to coffee last Friday. It was incredibly refreshing and fulfilling to just talk radio for two solid hours. I had a great time.
Finally, a big thank you to each and every subscriber for supporting The Random Wire newsletter. 73 to all!


Leave a Reply