Restomod for AllStarLink audio interface, two inexpensive multimeters, XHDATA radios, a simple inline switch solution, WisMesh Pocket replacement, and another Ten-Tec Scout 555 radio!
The audio podcast for this issue of The Random Wire dropped two days ago and is available on most podcast services and on Substack at:
https://www.randomwire.us/p/random-wire-reflections-for-issue-b37
Also, please note that links below ending with an asterisk are affiliate links. Purchasing through those links doesn’t cost you more and I get a tiny amount to help offset some of my costs in crafting The Random Wire newsletter and podcast for you. I appreciate your support.
.-. .- -. -.. — — / .– .. .-. . / .-. . …- .. . .– / -… -.– / -.- .— –… –
CONTENTS
1. AllStarLink Audio Interface “Restomod”
1.1 What is a restomod?
1.2 Parts
2. Tools
2.1 Two inexpensive multimeters purchased
2.2 Comparing the two multimeters
3. XHDATA Radios
4. Random Observations
4.1 Hams talk about their equipment
4.2 Cell phones, automatic gain control, and audio quality
5. Security
5.1 0.0.0.0 Day bug
5.2 Multilayered attacks
6. Miscelleneous
6.1 Inline switch (DC)
6.2 Replacement WishMesh Pocket arrived
6.3 New-to-me Ten-Tec Scout 555 on the way
.-. .- -. -.. — — / .– .. .-. . / .-. . …- .. . .– / -… -.– / -.- .— –… –
1. AllStarLink Audio Interface “Restomod”
1.1 What is a restomod?
First, let me describe what I mean by the word restomod? Resto refers to restoration, implying older, vintage equipment. Mod is for modification, but also think “modern.” Restomodding is the process of converting an old piece of equipment so that it has modern capabilities, making it function like something new while retaining the outward appearance of the original.
Wikipedia refers to restomod in the context of automobile restoration:
Restomod: Classic cars that combine original exterior styling with modern applied technologies (such as new suspension, wheels, transmission) or modern interior features (multimedia, etc.) for comfortable everyday use.
For this amateur radio project, I am restomodding a Kenwood PC-1A Phone Patch Controller case to function as a modern AllStarLink radio-less audio interface.
1.2 Parts
There are some new parts added to the list previously described in Random Wire Review issue 102. Listed below are the parts and supplies for this build…so far! (If there is an asterisk beside a link, that means it is an affiliate link.)
MAX9814 Electret Microphone Auto Gain Control Amplifier Sensor Module AGC Amplifier Board VGA Low Noise* (3 for $9.57)
PAM8406 5W+5W Mini Amplifier Board Class D 2.0 Dual Channel DC 5V Digital Stereo Power Amp Module for DIY Sound System* (2 for $12.59)
5K Ohm,Volume Control Potentiometer, 6 Pins Split Shaft Rotary Linear Dual Taper Audio B Type Potentiometer with Knob* (5 for $9.99)
LM386 Mono Audio Amplifier Module 5V-12V Adjustable* (5 for $7.49)
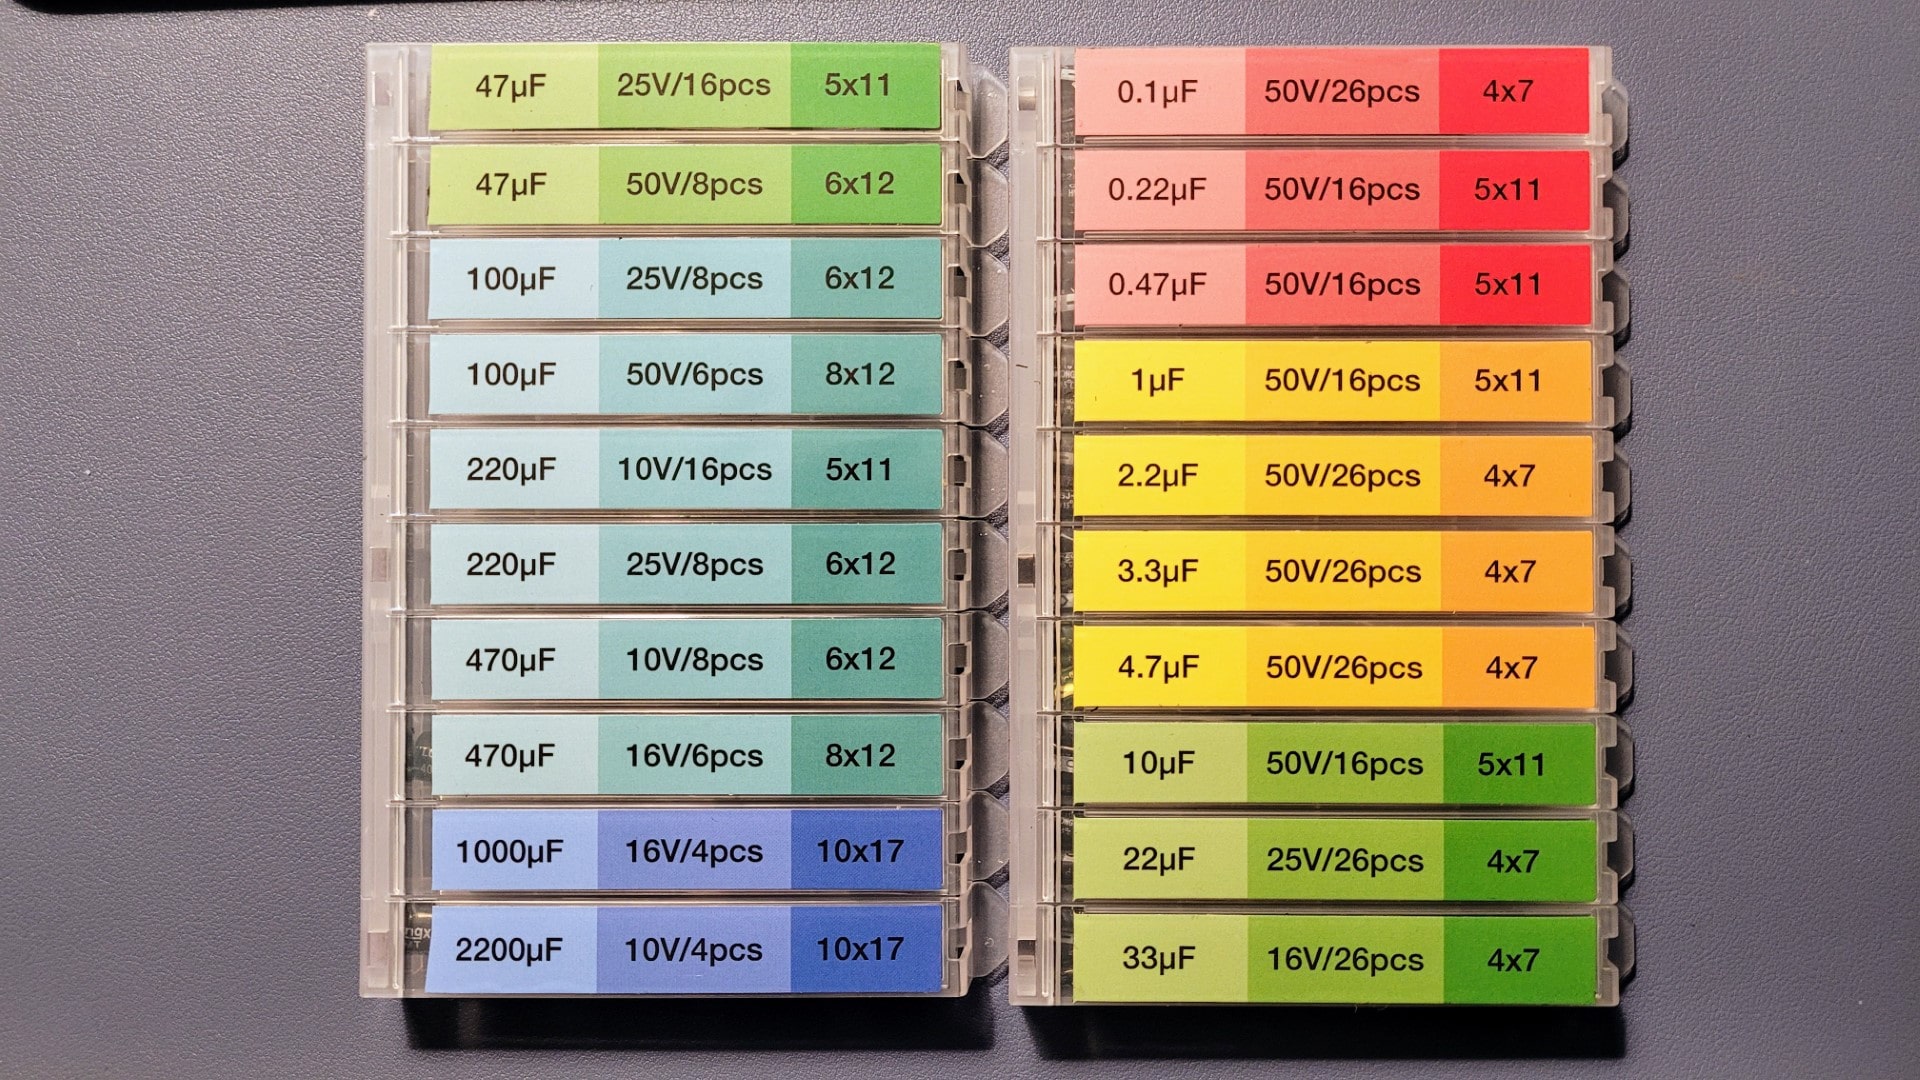
0.1uF-2200uF Electrolytic Capacitors* (304 pieces for $9.90)
So far, I’ve removed the following items from the PC-1A case: the original board from the PC-1A, a front panel switch, a real panel plate, and the power cord. Still left mounted are: the 8-pin microphone connector, a VU meter, two potentiometers on the front panel, a sliding switch on the back panel, and another potentiometer on the back panel.
Amplifiers
I did find a few of these items in my parts bins. The LOSC-brand PAM8406 board is one I picked up a few years ago. And it turns out I have a baggy full of XL6009 buck boosters.

The PAM8406 board can be configured as a Class D amplifier or a Class AB amp. The defaults on the board are (a) Class D amp, (b) shutdown disable, and (c) mute disable. All those are fine so I won’t have to change the defaults. The marks that look like fingerprints on the bottom of the board? That’s how it came from the overseas vendor!

As I started to fiddle with how the PAM8406 board would fit, I discovered that the board is so long that it interferes with the second potentiometer hole in the front of the case. Instead of using the board I already have, I ordered a couple of these small units: NOYITO PAM8406 Digital Amplifier Board 5W 5W Dual Channel Stereo Audio Module*
These smaller PAM8406 amps arrived yesterday. Here are two photos:


I have to confess that the LOSC-brand board looks stouter than the tiny NOYITO board. Maybe it’s the two electrolytic capacitors on the LOSC board that give this impression. Looking at the lack of those caps on the NOYITO board makes me think I might need to consider electrolytic capacitors with the NOYITO board.
Potentiometers
This should give me room to use two 5KΩ potentiometers on the front panel. A fallback would be to put one of the potentiometers on the back panel and use that location for adjusting microphone gain, but that is less convenient than having it on the front panel.

I think it makes the most sense to put the potentiometer for the PAM8406 amp in the RX GAIN position. This would control volume to the external speaker. The TX GAIN position would have the other potentiometer to allow microphone gain to be boosted through the MAX9814 board.
At this point, I removed the original pots from the PC-1A front panel to make it easier to see the positions I’m describing: RX for external speaker volume and TX for microphone gain.

The original potentiometer knobs fit the modern pots well enough so I’ll try to use them to help maintain the illusion of an original device. The new 5K pots fit well in these two holes.
Capacitors
I’m out of electrolytic capacitors. I could use one on the 8-pin microphone connector and another on the feed to the VU meter. Capacitors should help smooth out the operation of these devices. I ordered an assortment so I won’t run dry:
I haven’t yet sketched out how to put all the pieces together but I’ve been making audio notes while I drive. Talking about it helps me think through how the components will work together.
2. Tools
2.1 Two inexpensive multimeters purchased
I think my halfway decent multimeter is in storage somewhere so I did the unthinkable — I drove to my local Harbor Freight and bought a new multimeter. Why would I do such a thing? Convenience, pure and simple.
The Ames Dm1000 looks durable and comes with a case. For my general use (household and vehicles) it is probably more meter than I need. For amateur radio work, it should be sufficient for most tasks, even if measurements prove to be a bit off.

There’s no telling how accurate, precise, or durable this multimeter is. For tool reviews, I often turn to the ToolGuyd but for the DM1000, that site has little meaningful information. The DM1000 is alleged to be a rebadged Uni-T UT61E, a meter that gets decent reviews.
Could I have done better? Certainly. Was there a convenient place to just pop in and buy a reasonable multimeter? Not really. Harbor Freight met my requirements today.
I’m sure I’ll hear some comments about trusting anything from Harbor Freight. I’ve certainly had that opinion in the past. Today, though, as I examine this device, I feel like the overall quality is a bit better than in years past, at least with some thoughtful examination of the products by the shopper.
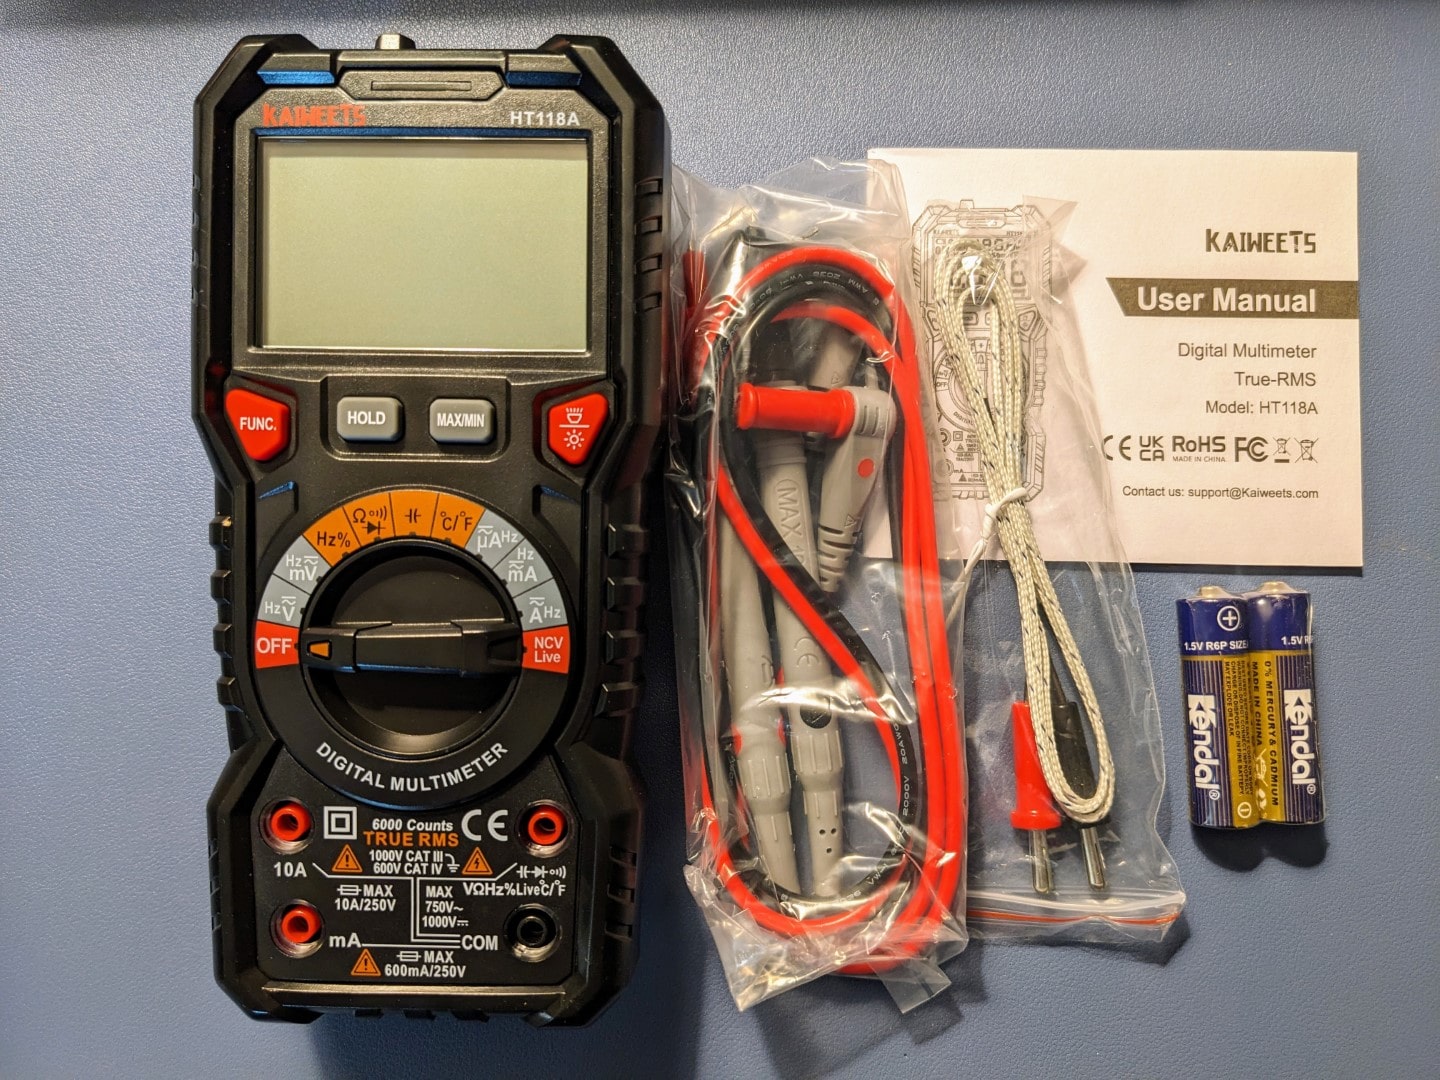
Despite that just-stated disclaimer that I feel better about Harbor Freight, I also ordered a less expensive (read that as: cheap) multimeter for overnight delivery. This one may live in the pickup truck: KAIWEETS Digital Multimeter TRMS 6000 Counts Voltmeter Auto-Ranging Fast Accurately Measures Voltage Current Amp Resistance Diodes Continuity Duty-Cycle Capacitance Temperature for Automotive* This particular item is part of a deal that includes a wire stripper. One can never have too many wire strippers!

Unlike the Ames multimeter, the Kaiweets device does not come with a case.
2.2 Comparing the two multimeters
Let’s take a look at the physical characteristics of the two devices: the more expensive Ames DM1000 ($70) and the cheaper Kaiweets HT118A ($40). I’m not equipped to opine on the accuracy, precision, or reliability of the units.
The Kaiweets unit takes two AA batteries, accessible through a panel on the back of the device. A single screw secures the door to the battery compartment. The Ames device is similar except it takes a single 9-volt battery.

The form factor and size are similar for the Kaiweets HT118A and the Ames DM1000 devices. However, the Ames device weighs more than (half again as much?) as the Kaiweets. Frankly, the Ames meter feels solid and the Kaiweets feels cheaper, as in lighter in weight and more “plasticky.”
The wire leads for the probes are not the kind that seem to adhere to each other. Leads that stick together drive me nuts. The insulation on the Ames probe leads feels a little more rubbery and substantial than with the Kaiweets device. Both sets of leads are adequate. Both devices also come with a temperature measuring probe.
The main dial control functions fine on both units, but the dial on the Ames device is simpler and less crowded. To my eyes, the dial on the Ames meter is easier to read.

The displays are quite readable for both devices.

Here the devices have backlighting turned on and both are propped up using the integrated leg stand that pops out from the back of the device.
Both devices claim to be true RMS devices. Both boast max voltages of 1000V CAT III and 600V CAT IV. Both have a max 600mA fuse. Both claim to have 6000 count accuracy.
Interestingly, both devices have a non-contact voltage detection (NCV) feature. The two devices differ in how they display NCV detections. The Kaiweets device is simpler: turn the dial to the “NCV Live” position and hold the sensor at the top of the device near the suspected circuit. In the gallery below, you see that the light switch in the OFF position generated a different response (green indicator on the meter and L on the display) than when the light switch was ON (red indicator and H on the display).
For the Ames device, the NCV procedure was a bit less clear: turn the dial to any position and hold down the NCV button. The meter did not differentiate between the light switch in the OFF position and when it was in the ON position. In both instances, the meter displayed a red indicator light.
The Kaiweets device seems a bit more intuitive in actual use because the dial includes the NCV setting and because it has a small nubbin on the top of the meter to indicate where the sensor is. I think the difference between the green light and the red light on the HT118A NCV detector is this: the green light is indicating a circuit is present and the red light indicates electricity is flowing through the circuit. This is an interpretation on my part as this is not described well in the small manual. (Someone please correct me on this.) For homeowners checking residential circuits, the Kaiweets HT118A meter seems a bit easier to use.
Of the two, the more expensive Ames meter feels heavier and more solid, the main dial is less “clicky,” and the probe leads are slightly more substantial. Still, for a toolbox meter for the household or vehicle, the Kaiweets may represent good value. Just be sure to put it into a case of some kind to protect it and to keep the parts together!
I’ll give the overall nod to the Ames DM1000 multimeter. It feels more substantial overall, the dial feels and sounds not too “clicky,” the leads are more substantial, and it comes with a case. The Ames unit feels like it might survive a drop or two, compared to the Kaiweets device. (No drop tests were performed to examine this conclusion!) I feel like I can trust the Ames DM1000 meter more than the Kaiweets meter.
.-. .- -. -.. — — / .– .. .-. . / .-. . …- .. . .– / -… -.– / -.- .— –… –
3. XHDATA Radios
I didn’t expect to have three XHDATA radios. I thought I’d just try one (the D-808) but then XHDATA offered the D-608WB and the D-200 for me to review. The D-808 satisfies my desire for airband coverage.

Overall, I’m liking the D-808 and D-608WB radios. While the D-808 is not quite the same as a Tecsun-brand radio, it is comparable and perfectly fine for listening to the bands I want. (My Tecsun radio lives in the camp trailer where we depend on it for information when cell coverage is poor.) The D-808 was well reviewed on SWLing.com.
The D-608WB radio is actually a fine unit. This type of household emergency radio is intended to be kept on hand for weather alerts and receiving information over commercial radio frequencies. As such, the radio needs an alternate means of charging, a flashlight, and reasonable performance on AM and FM bands. NOAA weather alert is a must and shortwave reception is a plus.
The D-608WB checks all these boxes and more. Charge it over a USB-C connection, or with a hand crank on the back, or with the solar panel on top. It uses a standard 18650-size battery so it’s easy to keep a spare on hand. It has the obligatory flashlight but also has a variable output LED light underneath the solar panel, good for area lighting in a tent or for late night reading. By the way, the solar panel tilts to help you capture the most energy from the sun.
You can pick up a D-608WB from Amazon* for not a whole lot of money. This unit feels solid, performs well, and has all the features I want in an emergency radio. I like this little unit more than any other emergency radio I’ve tried. It’s a keeper.
I’m listening to it while I write this. I have a microSD card with dozens of my favorite albums inserted into the radio and it is playing in the background for my wife and me. Unlike many small radios, it has a bass port on the back of the radio body that makes it more pleasant to listen to.
I’m still reviewing the D-220 so more on that to come.
4. Random Observations
4.1 Hams talk about their equipment
We hams are a funny bunch. When friends call each other on the phone, they don’t lapse into descriptions of their gear: “I’m calling on a Samsung model SM-G781U via my home wifi, using a headset that’s a bit of a homebrew.” People just don’t do that, but we hams do exactly this when we talk to each other on the radio. That, and report on our local weather and compare health issues.
4.2 Cell phones, automatic gain control, and audio quality
I also note that cell phone manufacturers have done a tremendous job with what I’ll call automatic gain control (AGC). AGC automatically adjusts the strength of an input. On the smartphones I’ve used, one can talk close to a microphone or several inches from it, and on the receiving end, it can be hard to tell if the talker is close to the microphone or not. Not so with our amateur radio gear! Distance from a microphone makes a huge difference in audio quality. I routinely hear stations with audio that is distorted because the person speaking their lips up to the microphone and is speaking loudly.
Checking our own audio using a Parrot ought to be part of our regular radio practice, even if only once a year. I tried a parrot on WIRES-X at 41619 but got no response. I’m looking for other WIRES-X parrots. Suggestions are welcome!
.-. .- -. -.. — — / .– .. .-. . / .-. . …- .. . .– / -… -.– / -.- .— –… –
5. Security
5.1 0.0.0.0 Day bug
Will the 0.0.0.0 Day bug affect AllStarLink nodes? This thought surfaced as I was reading a security article titled 0.0.0.0 Day: Exploiting Localhost APIs From the Browser. In the configuration of AllStarLink nodes, sometimes we use 0.0.0.0 as the IP address in a configuration file. For example, my manager.conf file has this set in the [general] setting:
bindaddr = 0.0.0.0Binding the IP to 0.0.0.0 provides no additional security beyond the username and password for the node. I’m not particularly worried about this on my home node because (a) I’m operating inside my local network and (b) I use a VPN to reach the node from outside the network. Setting the bind address to 0.0.0.0 is a convenience for me.
Is there risk in doing this? I suppose there is but I deem it an acceptable risk for my use case.
5.2 Multilayered attacks
Recently, an entity I work with was affected by bad actors. In popular parlance, they got hacked and lost a chunk of money.
The attack vector started out as you might expect — someone clicked a link they should not have clicked — but it escalated from there to a much more sophisticated operation. I’m still gathering information on this but wanted to get this warning out to my subscribers: be careful what you click! Bad actors are becoming more surgical in their approach and more convincing in their interactions.
If you have not yet enabled multi-factor authentication (MFA) now is the time. I resisted doing this for quite a long time because having to enter something more than my username and password seemed like too much bother. Considering the potential for harm, though, it really isn’t too much bother. If nothing else, you should have MFA enabled for your email and banking/investing services.
I now use random passwords, MFA, and USB security keys to help protect my assets.
6. Miscellaneous
6.1 Inline switch (DC)
The Behringer mic (C-1 medium diaphragm condenser microphone*) and pre-amp (MIC500USB audiophile vacuum tube preamplifier*) combo I bought from a seller on Amazon came with a power supply that did not work. (That might be why I got it for such a great price!) Fortunately, I already had a suitable power supply for one of my Dell Wyse 3040 thin client units that worked perfectly with the Behringer package.
However, to power up the pre-amp you plug the 2.1mm plug into the receptacle on the back of the pre-amp. Alternatively, you can keep that plugged in and plug in (and remove) the wall wart from the 120V socket. Neither method is convenient and both introduce wear on these components.
Instead of manually plugging and unplugging things, I bought a package of inexpensive inline switches. I gambled that the 5.5mm x 2.1mm plugs on the switch would work with the Behringer unit, and it works great.

This lets me keep the Behringer pre-amp plugged in at all times. When I need to use it, I power it up. When I don’t need it, I power it off. I don’t know if this introduces noise into the audio circuit but so far, it’s been fine. The podcast for this issue was recorded with the Behringer mic and pre-amp package using this little switch. This is my kind of solution: simple and effective!
Here’s another plus: this switch (there were four in the package) fits some of my Dell Wyse 3040 thin client devices, too.
6.2 Replacement WisMesh Pocket received
On Tuesday, I received a replacement WisMesh Pocket device from Rokland Tech. I reported on the original unit in issue 100.The one point in common with the two RAK-based Meshtastic devices that have failed is my USB-C charger. For the new WisMesh Pocket device, I’m charging on a very low-powered charger. We’ll see if that makes a difference.
Kudos to Rokland Tech for their help. The replacement device worked right out of the box. It shows up on the MeshMap.
6.3 New-to-me Ten-Tec Scout 555 on the way
Buying something off eBay is always a bit of a crap shoot. I rolled the dice and purchased a well-used Ten-Tec Scout 555 transceiver. (I do like a simple radio!) In the photos, the case looks a bit rugged in spots but the front panel, display, knobs, and rear panel look reasonably pristine. I have another old Scout 555 (reported in issue 96) that may not be working quite right so what is in a side-by-side comparison. If there is actually a distinct difference between the transceivers, I might do a bit of mix-and-matching to make one good working machine.
.-. .- -. -.. — — / .– .. .-. . / .-. . …- .. . .– / -… -.– / -.- .— –… –
Thank you for subscribing to The Random Wire newsletter. 73 to all!


Leave a Reply